This post is copied from my other blog at beaducation.com :)
Every day when I get to work, I sit down at my desk with a mug of Chai tea and begin the day with a glance around my office. Having no shame, I will share with you what I used to see:
I'm lucky enough to have a personal office with a built-in "Creative Workspace" and I had allowed that whole corner of my office to turn into a dumping spot. It was cramping my creativity big-time!
The first step is admitting there's a problem, right? The second step is taking action!
PIMP MY WORKSPACE!
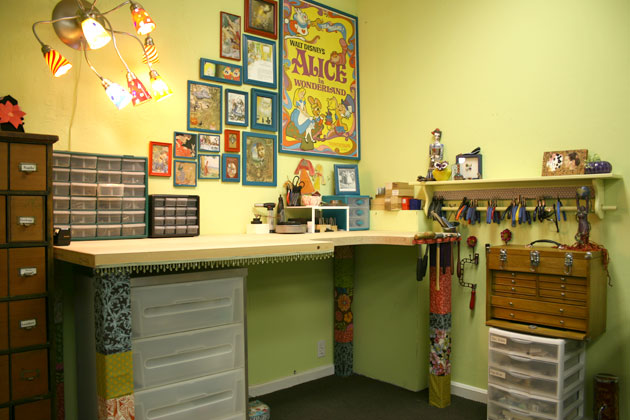
I considered buying a proper jeweler's bench, but instead I kinda made my own. My tabletop was a solid wood door, so I had our contractor, Dave, come in make a rounded cutout. Voila!
As you can see in the "Before" photo, the wood door was resting on IKEA storage cabinets. Functional, yes. Fashionable, not so much. So I had Dave attach real table legs. This worked great! The table is incredibly stable, it's the perfect height, and I have more space underneath. Only one problem -- the legs were ugly. Fabric and a staple gun to the rescue!
I have been collecting fabric for awhile (I don't sew...but I might someday - ha!). I cut the fabric in strips wide enough to wrap around the leg with a little overlap and folded the ends over before stapling it to the wooden legs. I had no rhyme or reason to the patterns or lengths, I just kinda went for it.
I really love how my new table turned out, and for a fraction of the cost of buying a generic jeweler's bench! Now... what to do with all those tools?
I always struggled for the perfect way to hang my hammers so they were out of the way, yet accessible. Pipe sleeves and spray paint solved my problem!
My main goal when redoing this space was to have all my tools organized in a smart and attractive way. Hammers had their new home, next came the pliers. An old quilt rack with shelf was the perfect solution. I painted the rack and lined it with contact paper to protect the painted wood from getting marred by the jaws of the pliers. This holds more pliers than one can possibly need (which is saying a lot coming from a tool addict like me!), and holds them at a perfect arm's reach.
I loaded this tool cabinet from Harbor Freight with files, drill bits, etc...
A few finishing touches included stapling on some beaded trim ('cuz why not, right?) and hanging a few
decorative hooks from Anthropologie. The real
piece de resistance included spray painting over 20 picture frames and filling them with favorite images from my collection of Alice in Wonderland books. Dave installed my Italian light and BAM, I was in business.
Finished product -- I LOVE IT! I am giddy every morning when I come in and see this inviting workspace. I can't wait to create, create, create!




 I know what you are thinking..."Hey wait a second, what is that writing on the side?". Well, since the container I chose was metal, I couldn't resist stamping on it (yes, I stamped it before putting in the foam). Again, bring on the challenge! I had to build a strong stamping surface in the container so I busted out my Sandbag, Bench Block and any available piece of wood that would fill the left over space. I didn't get regular and strong resistance so the stamping came out uneven (depth-wise) and it was a bit awkward, but it worked! I used the Wackadoodle Uppercase and Lowercase.


